Showing posts with label thinking of you. Show all posts

Monday, April 25, 2011

Thinking of You Tilda

Happy Monday everyone! Hope everyone had a wonderful Easter. We had a nice Easter ourselves. I have a new card to share with you. I had to make a bereavment card as my huband's Uncle died suddenly last week. He was so loved and will truly be missed!! Love you Uncle Pooky! This card was made for my hubby's Aunt.


I really have a hard time with Bereavement cards. I like to use 'Thinking of You' verses 'Sorry for Your Loss' sentiments. I chose Tilda with Flowing Hair for this card.

The papers are from Memory Box (Jubilee) and the cardstock is PTI. I used Nestabilities to cut the panels behind Tilda, Doohickey Dies for the tall leaves and the tag. I sponged some PTI ink around the edges of the tag. The small leaf punch is Martha Stewart and the Fern Punch can be found here. The flowers are from WOC and Prima. I added tons of Stickles to the flowers and to the flowers in Tilda's basket.
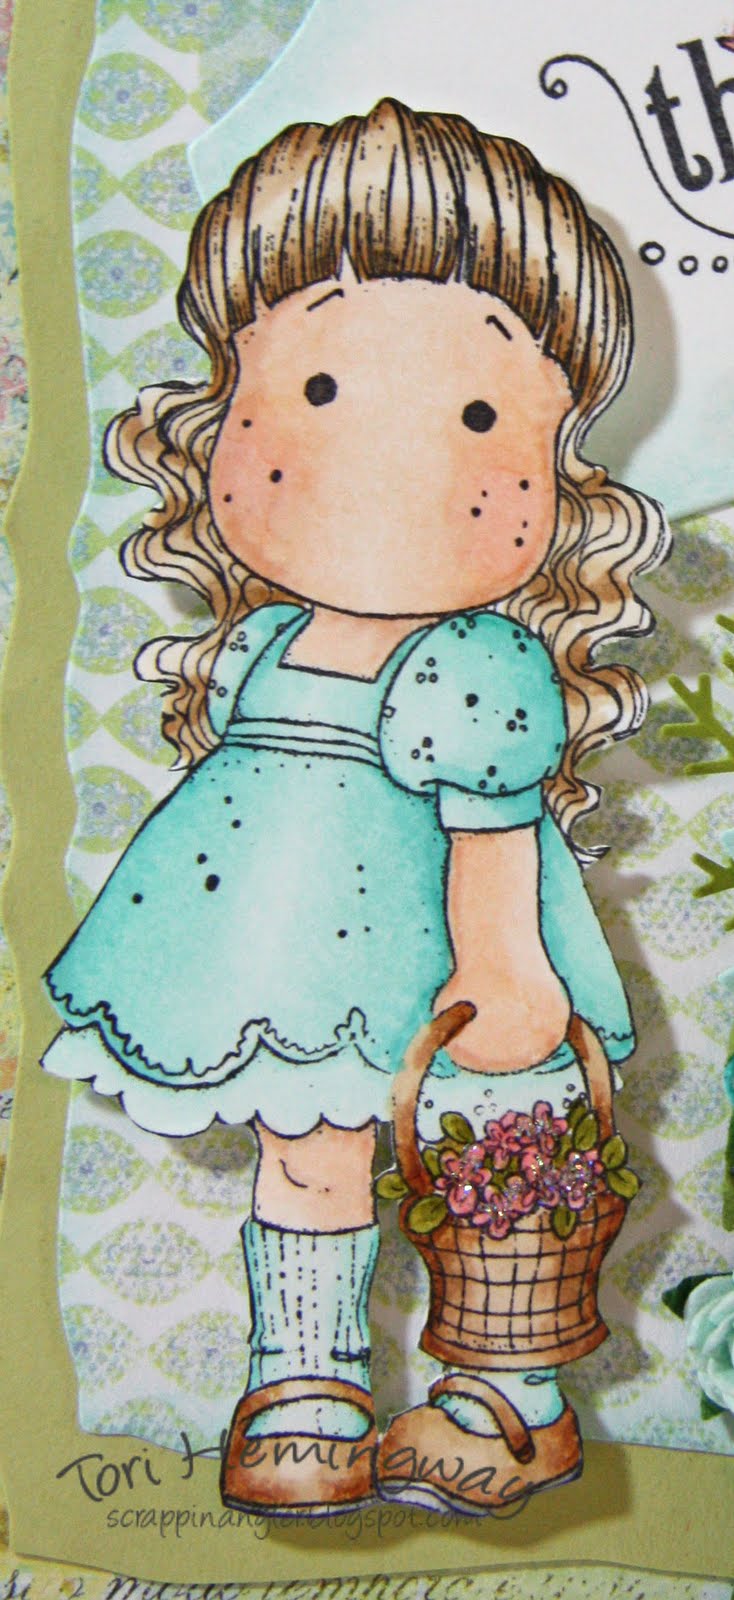
Here is a close-up of Tilda
I used these Copics on her:
E11, 00, 000, R30, E37, 35, 33, 30, E57, 35, 53, 50, BG15, 13, 11, 10, YG97, 95, R32, 35


Supplies:
Stamps - Tilda with Flowing Hair, Sentiment (Inkadinkadoo)
Paper - Memory Box, PTI
Ink - Memento, Copics
Accessories - Stickles, Nestabilities, Fern Punch, Flowers (Prima), DooHickey Dies (leaf and tag), MS leaf punch


Photobucket

Thursday, March 17, 2011

2 New Tilda cards!!

Happy Thursday night, y'all!! Hope everyone is doing well. I had a busy, but productive day working on some Spring Cleaning - fun stuff!! :) I do have a great sense of accomplishment, though.


I was asked to make a few cards for a customer, so I thought I would stop over here and share them with you!

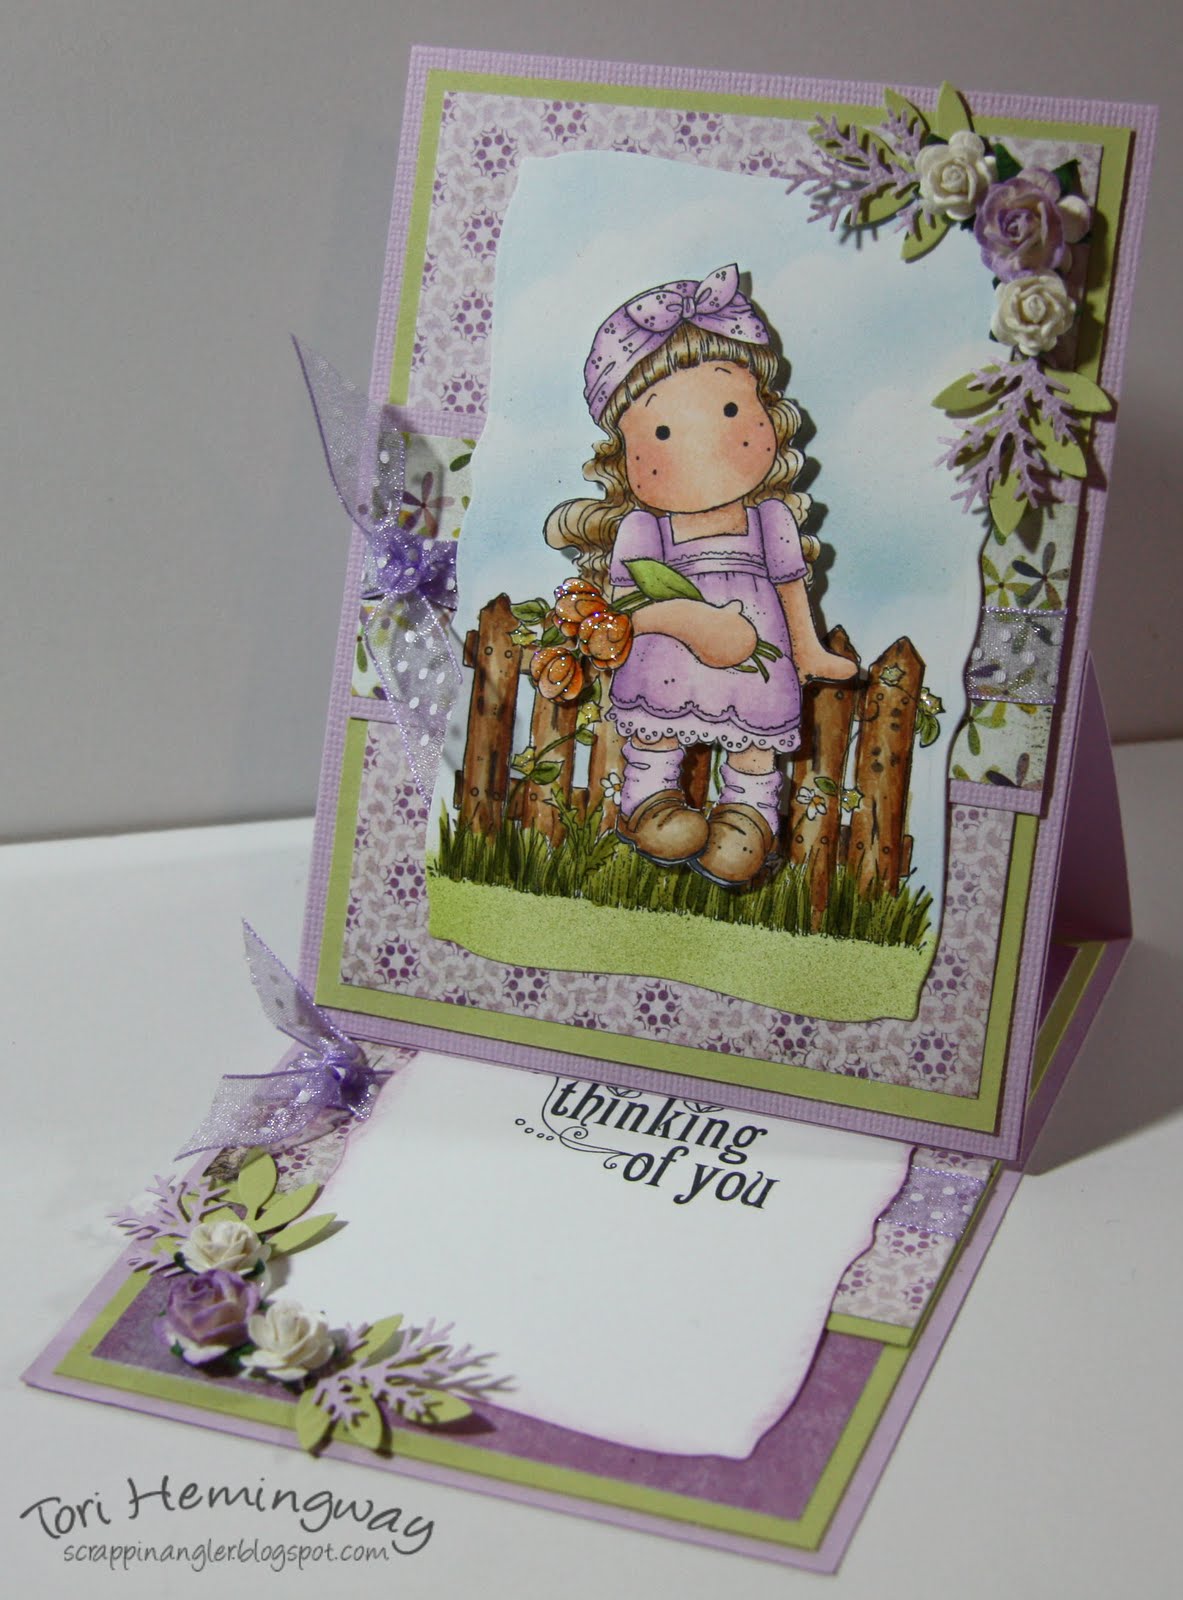
My first card is a Thinking of You card. I used Tilda with Three Flowers and Shabby Chic Fence (both Magnolia Stamps). To create the background, I stamped the fence and masked it off. I, then, masked off the ground and airbrushed the sky using a cloud template and B24 Copic Marker. I then turned the mask around to mask off the sky and airbrushed the ground. It really does not take long to master this!! Tilda was colored, cut out and layered on top of the background.
Here is the front of the Easel card.

This is the inside of the card.


I used these Copics: E11, 00, 000, R30, B24, YG23, YG97, V01, V12, V15, YG95, YG93, E37, 35, 33, 30, E57, 55, 53, 50, YR18, YR00


Supplies:
Stamps - Tilda with Three Flowers, Shabby Chic Fence (both Magnolia), sentiment (Inkadinkadoo)
Paper - Bazzill (purple), PTI, Kioshi DP (Basic Grey), Gina K 120# White
Ink - Memento, Copics
Accessories - Stickles, Copic ABS, Nestabilities, Fern Punch, leaf punch (Martha Stewart), Flowers (WOC)


My 2nd card is a birthday card using my new favorite Birthday Tilda!!

I used some Olivia DP from Basic Grey and SU cardstock for this card. I am on an Easel card kick again, so bear with me! The flowers are WOC and were inked with some SU ink and a sponge dauber as was the image and white panel inside of the card. I added lots of Stickles to her cake and candles. The leaf punch is from Nellie Snellen and can be found here along with the fern punch. The flourish is from Sizzix. The floral edge punch is from Martha Stewart.
I used these Copics: E11, 00, 000, R30, B24, YG97, 95, 93, 00, E37, 35, 33, 30, E57, 55, 53, 50, R27, 24, 22, 21, 20, Y15, Y38


Supplies:
Stamps - Birthday Tilda, sentiment (PTI)
Paper - Olivia DP (Basic Grey)
Ink - Memento, Copics
Accessories - Stickles, Copic ABS, Nestabilities, Fern Punch, Leaf Punch, Sponge, Floral Edge Punch (MS)


Photobucket


Tuesday, January 25, 2011

Have a Wonderful Day!

Good Tuesday Mornin', to ya! I am getting some stuff done in my office this morning - trying to stay off of the computer and be more productive!! LOL!

I have a new Maggie card to share with you this morning, using Lady Tilda.
I guess I am in my distressed phase right now, but it is so pretty and easy to acheive! The sentiment is a new one I picked up at my LSS last week from Hero Arts. I think it is very versatile, so you will probably wish I had never found it, because I will wear you out with it! LOL! The papers are some more Gossamer by Memory Box and the cardstock is Bazzill and PTI. The flower is the Retro Flower Punch from EK Success, the leaf punch is Martha and the swirl punch is from Sizzix. I added a pretty pearl to the center of the flower after I inked it with some lavendar distress ink.
Tilda was colored with these Copics:
E11, 00, 000, R30, E55, 53, 50, Y26, 21, 17, V06, V01, V00, V0000, G29, 24, 21, 20,

Supplies:
Stamps - Lady Tilda, Sentiment (Hero Arts)
Paper - cardstock (PTI and Bazzill), Memory Box
Ink - Memento, Copics, Lavendar Ink (Tim Holtz)
Accessories - Nestabilities, Pearl, Leaf Punch (Martha), distresser tool, flower punch (EK Success), sponges, swirl die cut (Sizzix)

Photobucket


Tuesday, October 27, 2009

Celebrate Today & Everyday - Day 2!

Good Morning Ladies! Hoping today is as productive as yesterday, so I will make this a quick one!

I love this stamp so much, I just had to use it again! I got my inspiration for this card from here.

This time, I stamped both the large and small flowers and the large leaf in the Friends 'Til the End set. I colored everything with my Copics and cut them out. The top flower was popped up using foam tape and Stickles were added to the center. I stamped the smaller flower on Ripe Avocado using Vintage Cream ink and stitched it to some Hibiscus Burst cardstock. I used the Modern Label punch (SU) to create the tag and stamped it using one of the sentiments from the Autumn Abundance set with some Avocado ink. I added some pearls (KaiserCraft) to the tag as well. The card base is Vintage Cream and the total card size measures 4.25 x 4.25.

Here are the Copics I used:

Supplies: Stamps - Friends 'Til the End, Autumn Abundance (PTI); Paper - Vintage Cream, Hibiscus Burst, Ripe Avocado, Stamper's Select White (PTI); Ink - Vintage Cream, Ripe Avocado, Copics; Accessories - Stickles, Pearls (KaiserCraft), Modern Label Punch (SU), foam tape, sewing machine

Hope you liked my quick birthday card! Have a great day! ~Tori

Monday, October 26, 2009

Celebrate Today & Everyday! and an awesome find!


Happy Monday Ladies! I am on a roll today! This is a busy week with class parties, Halloween, etc on top of all of the sports activities going on too, but I feel like I am in front of the 8-ball for now!
(Hoping to stay there all week! LOL!)

~~~~I added new stuff to my Etsy store this morning!~~~~

I have a cheery and bright birthday card to share with you today made using all PTI ingredients.

I stamped the small flower and leaf from the Friends 'Til the End set, colored them with my Copics and cut them out. I popped it up using foam tape and added some Stickles to the center of the flower. It's hard to see, but I stamped the small flower on the Ripe Avocado layer in Spring Moss ink(you can click on the picture and see it better close-up). I used the Threading Water border punch from Fiskars with some Spring Moss Cardstock. For the base of the card, I stamped polka-dots from the Polka Dot Basics II set onto Hibiscus Burst cardstock. The sentiment is from the Autumn Abundance set and was punched using the Modern Label punch from SU. I added an Avocado button and some linen thread to the tag.
Here are the Copics I used:

~~~~~~~~On to my Awesome Find!~~~~~~

Remember my Cocoa Packet post from last week? Well, my BFF, Dee, found these awesome mugs at Target!! I think they were about $2.99 each! How perfect of a match is that? LOVE it!

I plan to make some teacher gifts with these this year and include some marshmellows and maybe even a Starbucks card! She found some that also were a good match to the PTI colors: Spring Moss and Ocean Tides! Look for more of these from me soon!

Gotta run! Busy, busy, busy.... Hope your day is productive! ~Tori

Saturday, August 15, 2009

More Vintage Picnic!

Happy Saturday night to ya! I had a blast last night hangin' with my 'peeps', the CaRD ChiCKs! They are such a fun group of girls! We were short 2 of our cohorts last night - hope they can make it next time! We shared images to stamp, shopped online and stamped a little!

Tonight, I have 2 more cards to show you from the Vintage Picnic Set from PTI. I kept the color scheme the same as the card that I posted the other day, as I am making a gift set of cards. I am just really slow at it!
This is the first one - Happy Harvest. I used Lemon Tart, Summer Sunrise, Stamper's Select and Polka Dot Parade DP - All PTI. I added a little stitching to this one along with some Spring Moss Satin Ribbon (PTI), linen thread (SU), Nestabilities and punched the tag using a McGill window punch.

Here are the Copics I used:

~~~~~~~~~~~~~~~~~~~~~~~~~~~~~~~~~~~~~~~~~~~

Here is card #2:

I used the same papers, however, I ran out of Summer Sunrise and had to substitute some Bazzill until I get another PTI order! I used a CB Swiss Dots folder and some linen thread (SU) to finish it off. I did not snap a pic of the Copics, but here is what I used:

Apples - YG91, YG93, Y32, Y35 / Basket - E53, E55, E57

I will be posting another one soon using the PTI Warm Happiness set!

Thanks for stopping by!~Tori

Monday, March 16, 2009

3rd Monday Spotlight!!

Happy Monday, Y'all!


It's the 3rd Monday of my ATS DT stint and I am still lovin' it!!


The 1st project was made with a clear acrylic box I bought at my LSS. This little bunny is so cute peeking out!


I used my Copics to color the egg shell and then layered it on Certainly Celery paper. The belly band is Basic Grey Lily Kate. I sponged pink pirouette on the tag at the top and layered with my nesties. This was really quick and easy! It has taken a lot of willpower not to bust it open and eat the chocolate!! LOL!


Here are the copics I used:

Supplies: Stamps - Hunny Bunnies - ATS; Paper - Basic Grey Lily Kate, Certainly Celery, Whisper White; Ink - Memento, Pink Pirouette; Accessories - Ribbon - Creative Impressions, Copics, Nestabilities, sponges, Crop-A-Dile, Acrylic Box

On to project #2....

This card is made from the Mushroom Friends set. This little bunny is so sweet resting - wish my kids would rest more like that!


I used more BG Lily Kate paper for this along with some Pale Plum. I stamped this, then masked it and sponged Certainly Celery, Kiwi Kiss, Soft Sky and Bashful Blue for the background. I cut this out and layered onto more Pale Plum using Labels 1 Nesties. I then used my SU slot punch to punch holes to weave my ribbon through. I corner rounded all edges to give this card a softer feel. This card measures 5" square.


Here are the copics I used for this card:


Supplies: Stamps - Mushroom Friends - ATS; Paper - Whisper White, Pale Plum, BG Lily Kate; Ink - Memento, Certainly Celery, Bashful Blue, Soft Sky, Kiwi Kiss; Accessories - Labels 1 Nesties, Copics, Corner Rounder, SU Slot Punch, Ribbon

I wish I had gotten more cards made this weekend, but I came down with a nasty stomach virus on Saturday morning and never made it out of bed until Sunday night! It seems like was have had a lot of yuckies going through our house lately!! I am ready for some 'change' on that front for sure!

Thanks for stopping by!

~Tori


Wednesday, September 17, 2008

Brayered Essence


Here is another brayered background!! I LOVE this technique, so you will probably see a lot more of these coming down the pike. :) I made this card for a swap with some friends.
Supplies: Stamps: Essence of Love; CS: Whisper White, Black, So Saffron; Ink: So Saffron, More Mustard, Really Rust, Certainly Celery, Old Olive, Black; Misc: Word Window & Lg. Oval Punch, Apricot Appeal Ribbon, brayer, Pop Dots, Sponges
Technique: On WW CS, I tore the edge of a post-it-note and used it to create a mask towards the bottom of the panel. I then started brayering SS on the top half and then layered MM above it. I then sponged RR towards the top. I took off the mask and then sponged CC and OO on the bottom section. I then stamped the flowers using black ink after I let everything dry a bit. I heat set the black ink - it did not dry right away. I sponged both punched pieces. I also punched the card base with SS to make the color more rich.
TFL!

Wednesday, September 10, 2008

My 1st Brayered Background!!


I totally cased this one (can't remember from who right now) and I LOVE how it turned out!

I started out by brayering whisper white with barely banana and pretty in pink. Next, I layered the top with purely pomegranate and then sponged it to blend it. On the bottom, I brayered certainly celery and old olive and sponged OO to blend. Lastly, I stamped using the Essence of Love in black.

Here is the tutorial for the brayered background:

http://www.splitcoaststampers.com/ee/index.php/resources/tutorials/brayered_sky/