Showing posts with label gift sets. Show all posts

Wednesday, February 15, 2012

New for 2012!!

Happy New Year, y'all!  Hope everyone is having a Blessed year so far!  First I would like to start off by sharing a Christmas photo of the kids!

They are getting so big these days!

Here is some new stuff that I have created in 2012!

New Birthday card I created using brand-spankin' new PaperTrey Ink stamps!!

 This is the new Think Big Favorites #12 and the Lace Bouquet sets.  I stamped the flowers using Aqua Mist and Moss (PTI inks) to give it a multi-colored blend.  The sentiment was stamped in Moss onto Aqua Mist paper and pearls were added.  Easy peasy!  (it's available in my shop if you are interested!)

Muslin Favor Bags are all the rage, so I decided to try my hand at some!

 Easter or can be stamped with no sentiment for Baby Showers!
 Wedding/Baby Showers!
 Destination wedding favors!
 perfect for Princess Party faovr bags!!

Destination/Beach Weddings
I think they turned out adorable!

Here is some new Easter Stuff:


You can check out all of this new stuff in my shop!

Have an awesome rest of the day!  I will be back soon to share some other new stuff with ya!

~Tori


Photobucket

Monday, December 13, 2010

Mini Maggie's Card Set

Happy Monday, y'all! I am really wishing someone from the North would shut the door - it's COLD in FL!! It got into the low 20's/upper teens last night! The high today was 44! Eeek!

My Maggie MINI'S arrived last week and I have never busted anything out and inked it up so quick! I think they were mounted and inked up within a few hours of donning my doorstep! I made a set of 3 mini cards with envelopes for a cute giftset.
The cards measure 3.75 x 3.75 and fit perfect in the 4x4 square envelopes from PTI. I am still in love with this Wonderful Winter DP from MME - I can't get enough of it! The sentiment is from a PTI set.
Here is Christmas Party Tilda
Here is Tilda with Wreath
This one is Tilda with Fir

I will be adding this set of 3 to my Etsy store soon!


Stay warm and stamp, y'all! I will be baking all day tomorrow - lots of yummy treats!


Supplies:
Stamps - Mini Maggies (Tilda with Wreath, Christmas Party Tilda, Tilda with Fir)
Paper - Wonderful Winter (MME), Cardstock (SU)
Ink - Memento, Copics, Cool Caribbean Ink (SU)
Accessories - Stickles, Nestabilities, Fern Punch, bling , Martha Stewart border punch


Photobucket

Friday, August 27, 2010

Just a Note!!

Happy Friday, y'all!! I hope everyone is having a good day! I have been getting scrappy in my office today.

I was looking for a quick and easy gift to make for teachers, friends, etc. I found a great template and made two sets of gift cards and holders.
I found this Notecard Template from PTI. It is so quick to put together! I used the Laying Nora CC Designs stamp to quickly embellish. She was colored using Copics. This cute paper is from KaiserCraft Hippy Girl DP stack. All of the embellishments are from PTI. This set includes 6 cards and envelopes.
Here is the second set. This sentiment says "Just A Note".
I used paper from the same DP set.
Copics Used:
Skin - E000, E00, R20
Hair - E57, E55, E53, E50
Dress & Flower - RV10, RV13, RV14, BG10, BG11, Y15, YR68

Supplies:
Stamps - Laying Nora (CC Designs), sentiments (PTI)
Paper - Kraft, Aqua Mist (both PTI), Kaiser Craft Hippy Girl DP
Accessories - Sookwang Tape, Scoring Tool, Timeless Template (PTI), Word Window Punch (SU), Button, Ribbon, Twine (all PTI), EK Success border punch

Have a fabulous weekend. I plan on relaxing and spending time with the family this weekend!
Hugs,

Photobucket

Friday, August 20, 2010

Coffee Time!

Happy Friday, y'all! I have a jam-packed day of school stuff today, but wanted to she a quick project I did this week using Starbucks Via packets. I thought these would be a cute and quick gift to give a teacher or friend as a Thank You, etc. As you probably know, Starbucks sells these Via Instant Coffee packs that hold 3 packets. I took one of the packages apart and made my own packaging. C'mon - we are scrappy gals, of course everything has to be re-packaged and have a stamp of some sort incorporated into the mix, right?
So here is my version!

To create the packaging, I disassembled the original packaging and traced around it - really inventive, huh? I did tweak it a bit for my needs. I used some Kaiser Craft Lush DP and paired it with some Basic Grey and Really Rust cardstocks - both from SU. I used the Warm Happiness PTI set to create a really simple focal point. The mug was stamped using coordinating inks, cut out and layered onto some Vintage Cream (PTI) cardstock. I used my Oval Nestibilities to cut it out and inked around the edges of the stamped image with some BG ink.

Instead of making the top flap fold into the bottom flap like the original package, I created a simple belly band with the help of a scoring tool and some measuring. The belly band slides off and viola, you can get to the goods! Here is a peek of the inside - very simple. I guess I could have lined it with some DP, but I was just playing around with this one and I got it right on my first try! Sometimes when trying a new altered item or template, I have to make a few samples of it to work out the kinks. Next time, I can embellish it more, just wanted to see how it came out. The packet still holds 3 Via packets just like the original one. This packaging could hold other individually packaged mixes like Crystal Light and I think Splenda is even packaged like this too. I recently bought the Taster's Choice version like these while on vacation and it was surprisingly very good! They are probably a lot cheaper than Starbucks version and come 20 to a package, so they would be a cute and economical accompaniment to a coffe mug for a present or something of the sort!
Well, I am off to drink some coffee now! I use my Keurig Coffee maker - totally addicted to it! Maybe I need to make a Keurig Coffee Gift Set....hmmm...wheels are turning...a box that holds 2 pods and a cute card to match.....hmmmm....might be coming down the pike soon!

Have a great day!

Photobucket

Thursday, May 20, 2010

Friend Gift Set

Happy Thursday, peeps! Hope everyone is doing well today. If you are visiting my blog, not just reading my newsletter via email, you will notice my new look!! I decided to delve into a little digi scrapping and create a new background and header for myself. I am pleased with how it turned out as I have not done anything like this before! I use Photoshop, but have never used it that way before.

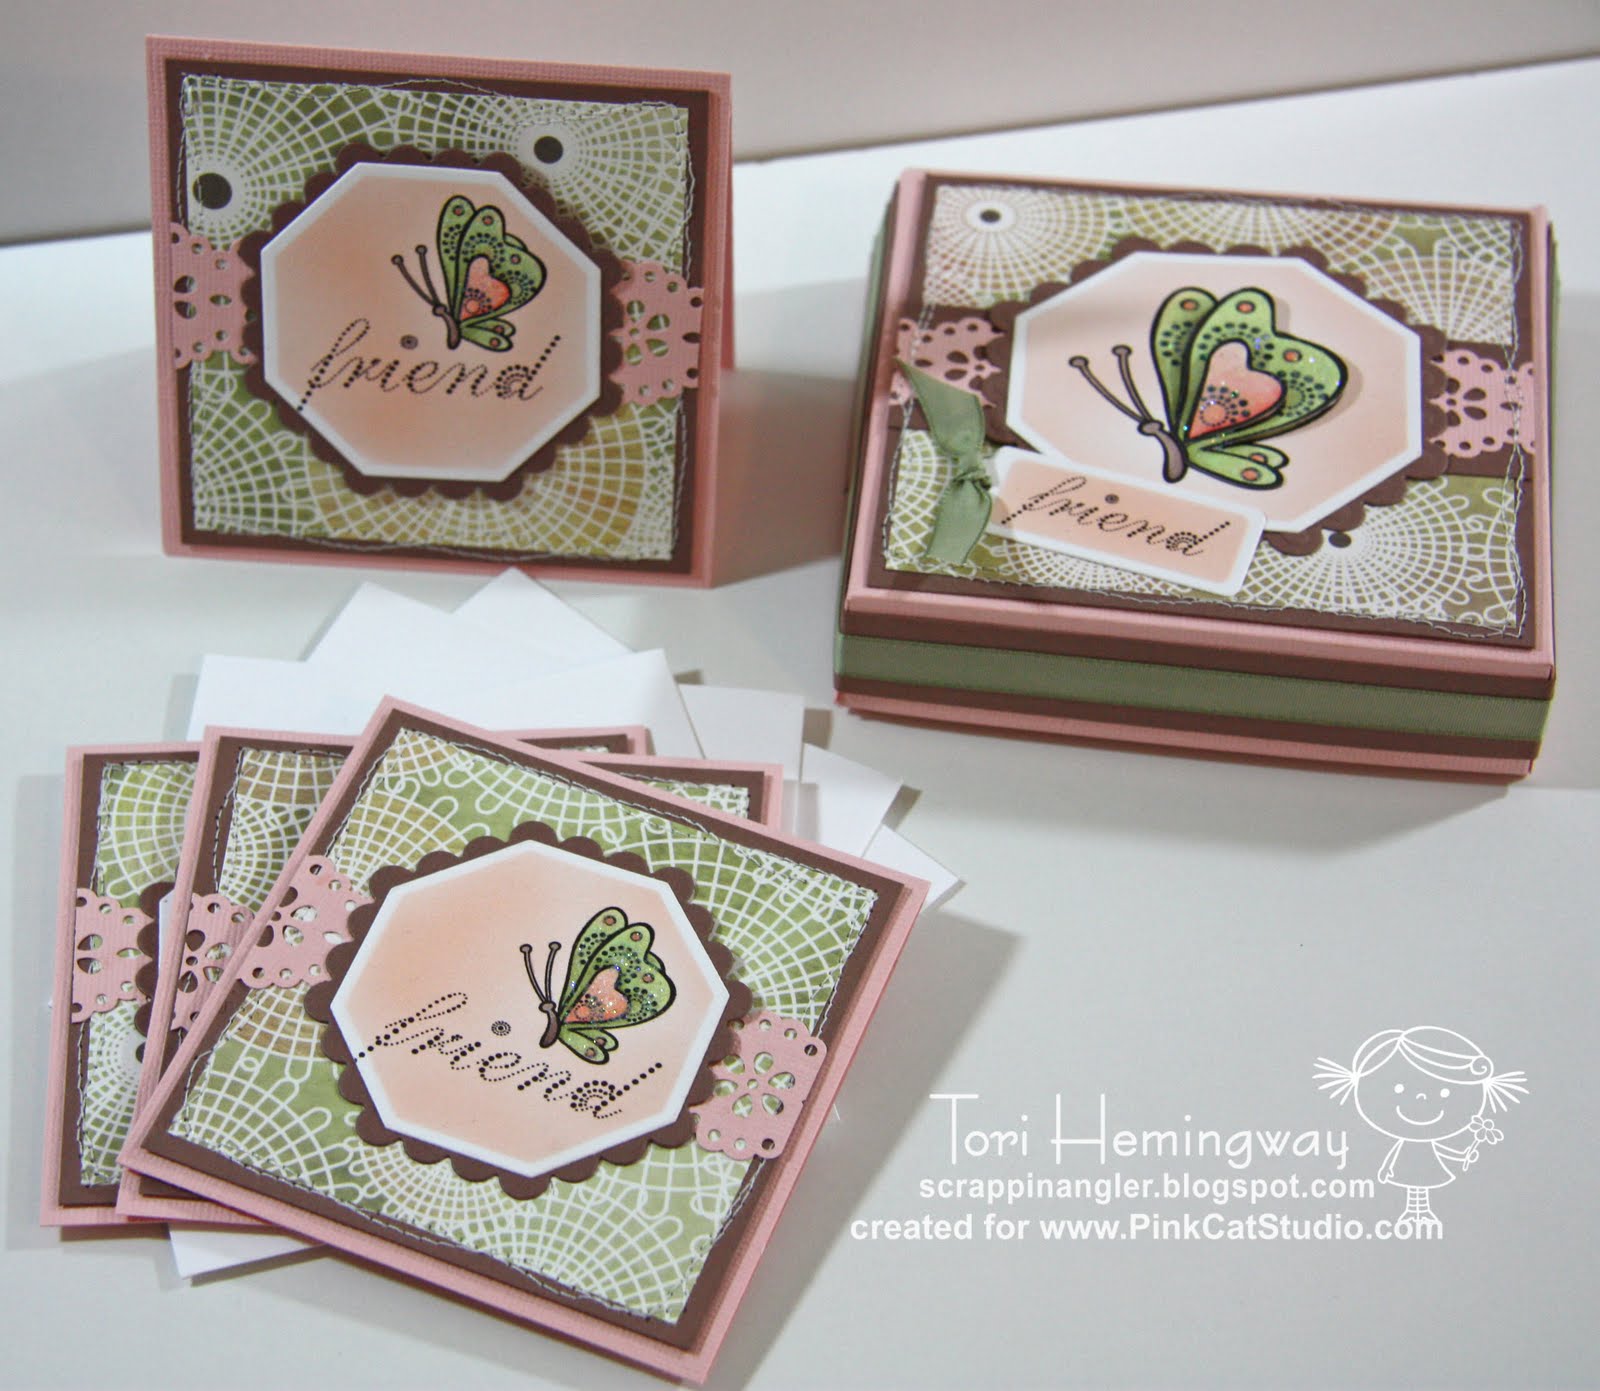
Of course, Pink Cat Studio has some awesome new digi's for sale today!! Butterflies!! They are just gorgeous - you can shop for them here. I decided to make a set of 4 cards and a Pizza Box to hold them using the Pretty Butterfly Side Image. (For the cards, I used the Word Art Image and for the top of the box, I used the plain image and then the sentiment from the Dots & Delights: Sentiments image set.Here is the link to the Pizza Box Tutorial. The cards measure 3.75 x 3.75 and the box measures 4.5 x 4.5. I altered the tutorial dimensions a little because I have 4x4 envelopes and it was a tight squeeze getting them in the orig. box, b/c it measures 4x4.

I used some Pink Bazzill and Close to Cocoa cardstock along with some Basic Grey Porcelain DP. I stitched the DP to the Cocoa cardstock using my sewing machine. I pulled put my octagonal nesties along with a Martha Stewart punch. I airbrushed some R21 on the image panel.

Here is a close-up of the box top. I printed the butterfly image 3 times and layered the wings for dimension. I colored everything with Copics and added lots of clear Stickles to her wings. For the lid, I printed the sentiment separate and cut it out with a tag Nestie and added some Mellow Moss ribbon (SU).

Here is a view of the inside - the cards fit nicely after I altered the dimensions. Here is a close-up of the card. I did not layer the wings, but colored them the same and added the glitz!
I think this will make a nice friend or teacher gift. Hope this project inspired you to use some butterflies and create something beautiful! Thanks for stopping by!

Photobucket

Thursday, April 8, 2010

Baby Thank You's

Happy Thursday, Y'all! I hope everyone is having a good week so far. I am a little behind on all of the things I need to get done for my company and birthday party this weekend, but it will all work out! :)

Since it's Thursday, that means Pink Cat Studio has new digi's released today!! You can shop for them here. I made a set of 3 baby Thank You cards. I think these babies are adorable!! The cards measure 3.75 x 3.75 and are blank on the inside. I used some Oh Baby Boy! DP from Basic Grey along with some Brocade Blue and So Saffron cardstock. The images were printed onto PTI Stamper's Select White cardstock. I used my Retro Flower punch and 'smooshed' the petals for a little dimension. The leaf punch is a Martha Stewart punch. The sentiment is from SU as well as the oval punch I stamped it on.

Here are some close-ups of the cuties. You can see in the close-up, I did some machine stitching too.


I was a little pressed for time this week, so I completely forgot to add some liquid glass to the baby bottles and rattles. I will go back and do this before adding them to my Etsy store.
Here are the Copics I used.
Check out all of the cuties Melissa drew! They are adorable! Be sure to check out the other DT members' blogs for more cuteness! :)

Have a great day! ~Tori

Thursday, February 25, 2010

PCS New Rubber & Digi Release!!

Happy Thursday, y'all! Hope everyone is staying warm and toasty today! I saw that the NE is supposed to get lots more snow. My in-laws outside of Philly are expecting about 18 more inches!! Too much of the white stuff for me. It is cold here in FL again, too. But, at least Parker's soccer practice was cancelled last night - it was 50 degrees and pouring. I did not feel like coaching a bunch of 6 yr olds in that mess!


Today, Pink Cat Studio is releasing new Rubber Stamps as well as new digi's!! You can shop for the new Rubber Stamps here and the new Digi's here. Lily just loves to dress up and she has some super cute outfits! My first project uses the Lily Butterfly image. I thought the sentiment was screaming for some chocolate kisses, so Lily is sending you chocolate butterfly kisses!

I picked up a few of these acetate boxes at my LSS last year. They are perfect for a small treat for a teacher, etc. I pulled out some Basic Grey Lily Kate DP for this set. Pink Pirouette pairs nicely with these papers. I added some leaves (MS & EK Success punches), some primas and some bling to embellish this card. I cannot forget all of the Stickles I used on her wings! Gotta have shimmer when you are talking about butterflies! I colored Lily with Copics and cut her out. I popped her up with some 3-D foam tape over the oval. It is hard to tell, but I airbrushed the oval with some RV000. Here is a close-up of the treat. I used the MS Doily Lace border punch to make a belly band for the box. For the top, I added some primas, leaves and bling to tie it together with the card.

Here are the copics I used for this card:
For card #2, Lily is dressed as a bumble bee. I could not resist making another shaker card for this one! Ask my former neighbor, Bev, I have always loved making shaker cards. I have not been her neighbor for almost 6 yrs and I made them back then too! Miss you Bev! This is another shape of shaker card offered by Impression Obsession. I filled it with some micro beads, yellow & clear seed beads and some yellow and black flowers I punched. I used Yo Yo Yellow, Whisper White (for layering only - I only color on either PTI or Gina K paper), and some PTI polka dot DP. I airbrushed the little yellow flower since I did not have the right shade and layered it on a white flower and added a black brad to the center. A card from me isn't complete if it doesn't have some fern leaves! LOL! The flourish is a QK die. Isn't that such a sweet sentiment?
Here is close-up of this cutie! I just love her bee-hive hair do! I am branching out and trying to make more of my girls brunettes. I am a blonde and I think it is natural to go with what ya know, but I am stretching my wings! :)


Here are the copics used for this card:


My final card has Lily as a LadyBug! Yes, I know I have used lots of polka dots tonight! I just could not help myself with these cute images! Melissa has all of these wonderful free sentiments available here. I used some Pure Poppy, black, Whisper White and some more polka dot DP from PTI for this card. The lacy border punch is by MS. I layered Lily on top of a panel that was embossed with a CB folder.I cut Lily out to give this card lots of dimension. Her antennae were too delicate to cut around, so I cut them off and added some wire in their place. I only had silver wire handy, so I colored it with a Black 100 Copic marker. I cut the red balls out and stuck them on with a glue dot. I added Stickles to all of her black polka dots and some white gel pen to her cheeks.


Here are the Copics I used:

Here is a picture of everything being released, so pop on over to her shop and check them out along with the other DT members' blogs (addy's on the right hand side)

Gotta run! Have a great day! ~Tori