Thursday, May 27, 2010

Post-It Note Desk Tidy

Happy Thursday to ya! I am chaperoning a field trip for my daughter's Jazz Band this morning, so I will be brief!


Pink Cat Studio has some new Digi stamps out today!!
Melissa is even giving away another free image with purchase today only!
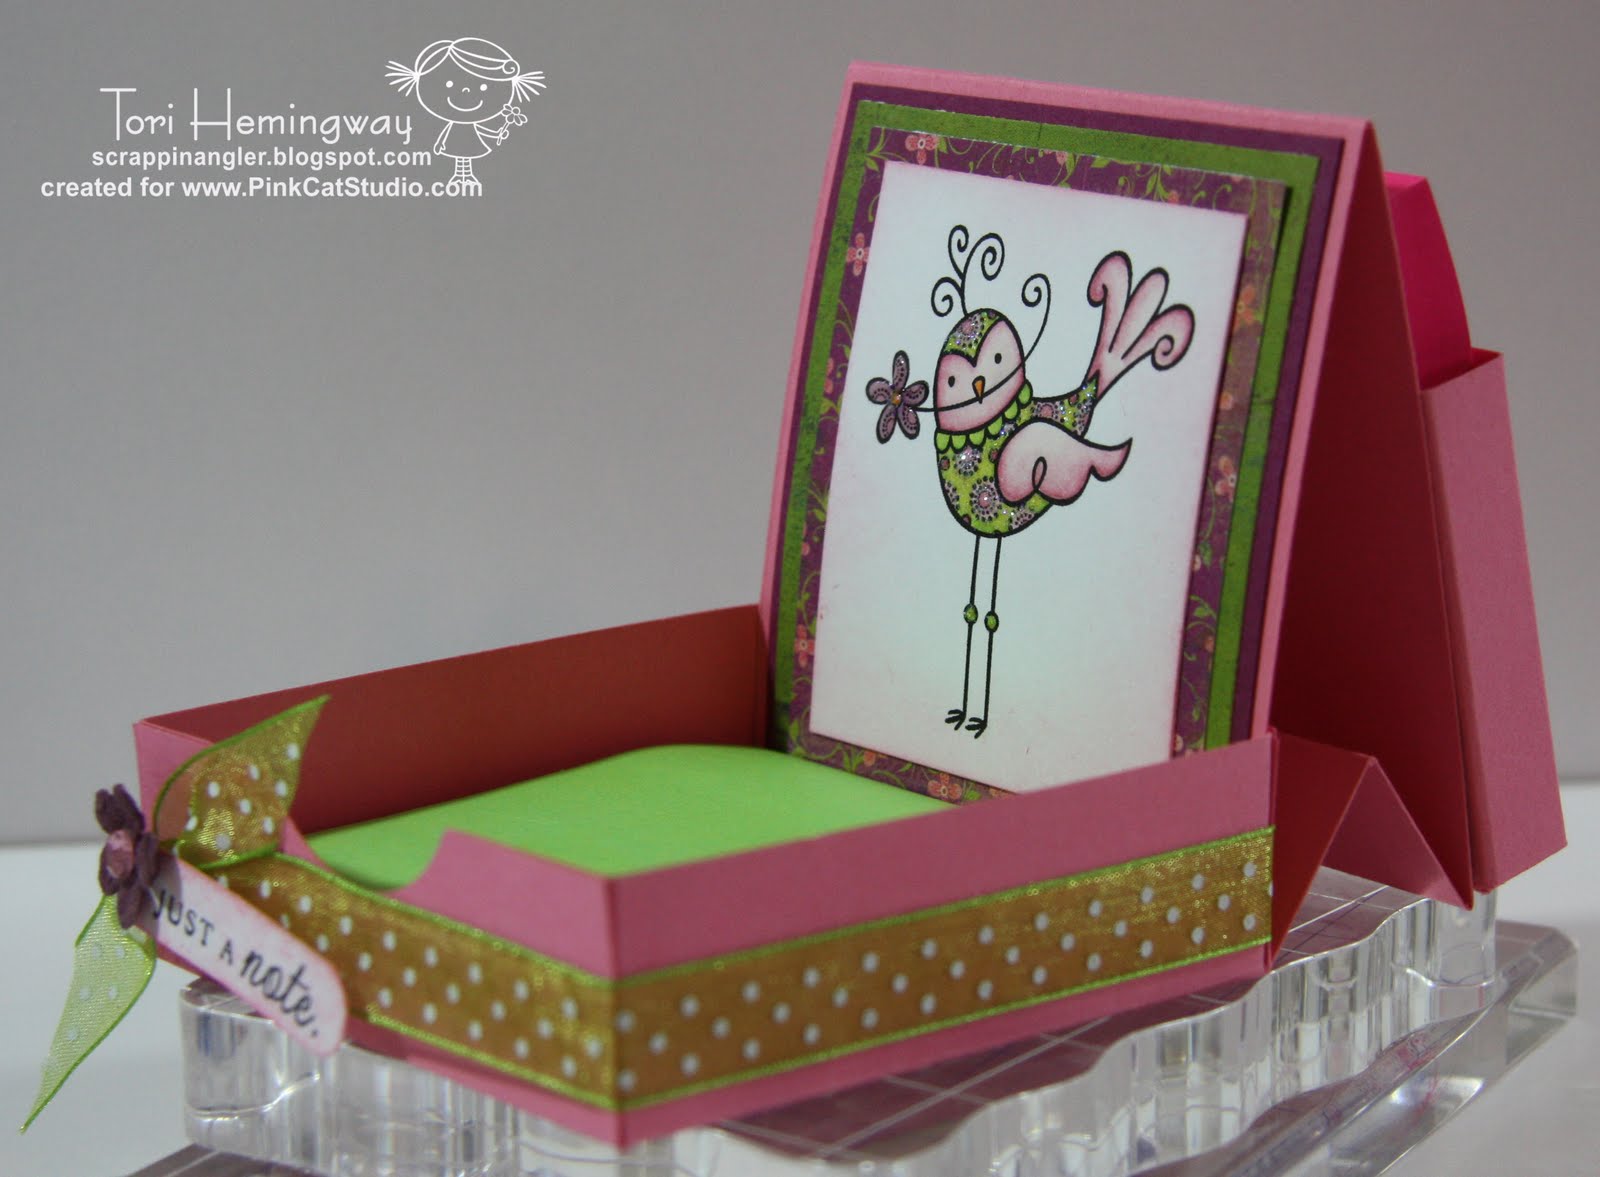
I wanted this sweet image to 'live' on my desk, so I decided to create a Post-it Note Desk Tidy to display it! I am not sure about you, but I am always reaching for my post-it notes! It is a super-easy project and can be made with one sheet of 8.5 x 11 paper!
The dimensions for making your own Desk Tidy can be found here.
I altered the back pocket to be a little bigger. For the back pocket I used the following dimensions: 5.25 x 3.25. Score the 5.25 length at 1/2", 1", turn around and score this end at 1/2" and 1" too. Score the 3.25 end at 1/2" and 1". Do not score other end, this will be the top of the pocket. Here is a side view. You can see the pocket in the back that holds additional post-it notes.
Here is a close-up of this lil birdie. I colored her with Copics, sponged some Regal Rose around the image and added lots of Stickles. I used some Basic Grey Going Green DP and some Regal Rose card stock. I added some lime green dotted ribbon, a sentiment from PTI, a prima flower and some bling.

I hope I have inspired you to create one of your own!
Hugs~ Tori

Wednesday, May 26, 2010

Scallop-Shaped Easel Card Tutorial

Happy Hump Day, y'all! Hope everyone is having a nice week so far! It has been a whirlwind for me with all of the end of the year parties, field trips, etc. I cannot believe Summer is almost here!

How's this for a teaser??I have a brand new tutorial posted over at the Whiff of Joy Tutorial & Inspirational blog and would love for you to check it out! Hop on over there and check it out and if you have a minute, hop back here to let me know what you thought!

Be sure to stop back by tomorrow for some new PCS digi's too! ~Toodles!

Photobucket

Thursday, May 20, 2010

Friend Gift Set

Happy Thursday, peeps! Hope everyone is doing well today. If you are visiting my blog, not just reading my newsletter via email, you will notice my new look!! I decided to delve into a little digi scrapping and create a new background and header for myself. I am pleased with how it turned out as I have not done anything like this before! I use Photoshop, but have never used it that way before.

Of course, Pink Cat Studio has some awesome new digi's for sale today!! Butterflies!! They are just gorgeous - you can shop for them here. 
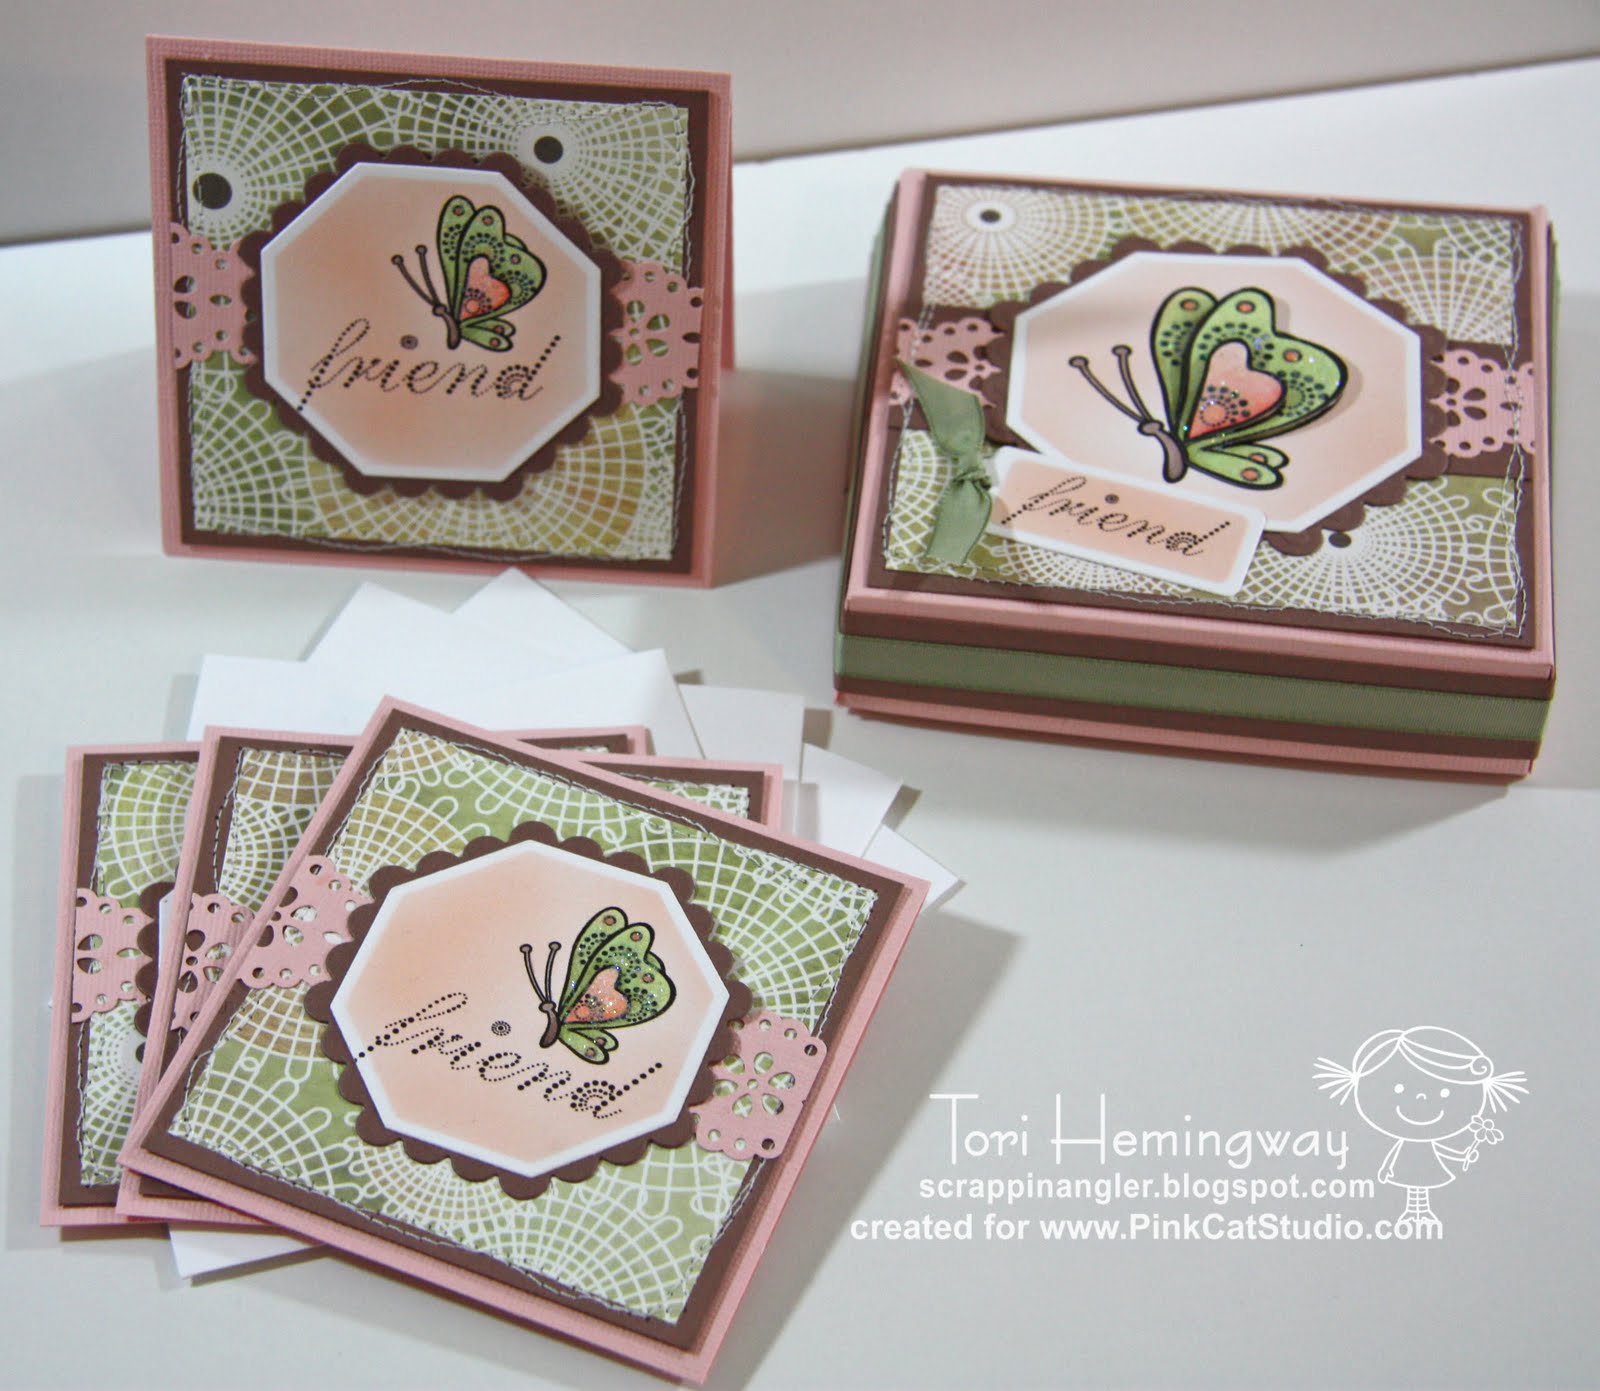
I decided to make a set of 4 cards and a Pizza Box to hold them using the Pretty Butterfly Side Image. (For the cards, I used the Word Art Image and for the top of the box, I used the plain image and then the sentiment from the Dots & Delights: Sentiments image set.Here is the link to the Pizza Box Tutorial. The cards measure 3.75 x 3.75 and the box measures 4.5 x 4.5. I altered the tutorial dimensions a little because I have 4x4 envelopes and it was a tight squeeze getting them in the orig. box, b/c it measures 4x4.

I used some Pink Bazzill and Close to Cocoa cardstock along with some Basic Grey Porcelain DP. I stitched the DP to the Cocoa cardstock using my sewing machine. I pulled put my octagonal nesties along with a Martha Stewart punch. I airbrushed some R21 on the image panel.

Here is a close-up of the box top. I printed the butterfly image 3 times and layered the wings for dimension. I colored everything with Copics and added lots of clear Stickles to her wings. For the lid, I printed the sentiment separate and cut it out with a tag Nestie and added some Mellow Moss ribbon (SU).

Here is a view of the inside - the cards fit nicely after I altered the dimensions. Here is a close-up of the card. I did not layer the wings, but colored them the same and added the glitz!
I think this will make a nice friend or teacher gift. Hope this project inspired you to use some butterflies and create something beautiful! Thanks for stopping by!

Photobucket

Tuesday, May 18, 2010

For a Sweet Friend Mingle Card

Happy Tuesday, y'all! It is really a pretty day today here in FL - yesterday, it rained cats & dogs yesterday, so some sunshine is definitely welcome!

I made this card for my Magnolia-licious May Mingle partner, Line Cinq-Mars. I really hope she likes it! The May Mingle theme was 'flowers'. This was my very first time to participate in a mingle and I hope I did it justice.
I used Tilda with Flowing Hair and Spring Tree - both available at Magnolia-licous! I used some Basic Grey Sultry papers along with some Pink Pirouette and Kiwi Kiss card stock. The sentiment comes from Amy R's Friend Sentiments set. My flowers are from Wild Orchid Crafts and the fern punch is Martha Stewart. The punches used on the sentiment are Stampin Up and the bling is Kaiser Craft.
Here is a close-up of Ms. Tilda. I colored her with Copics and cut her out. It is hard to tell, but I added some Stickles to the flowers in her basket. This card is very 'blingy' actually. I also added Stickles to all of the flowers on the tree and around the tips of the paper flowers as well! I masked off the tree and airbrushed the background on with my Copic ABS. Tilda is popped up with some 3-D foam tape. Copics are listed below.
Hope you have a great day! ~Tori

Saturday, May 15, 2010

A Special Wish...

Happy Saturday, y'all!! I am off to my last set of soccer games today, but wanted to share a new Whiff of Joy card with you.

This beautiful princess is part of the Aladin 1001 Nights store set from WOJ. The sentiment comes from the Scheherazade1001 Nights set released in April. I used some Basic Grey Sultry papers along with some Pretty in Pink and Kiwi Kiss card stock. The image was stamped and colored on Gina K. 120 lb paper. The leaf punches are Martha Stewart and the flowers are Prima. I added lots of clear Stickles to her clothes and the flowers. The button and twine are PTI and the bling is KaiserCraft.
Here is a close-up of this sweetie. Love all of the sparkles on her. I airbrushed the oval panel behind her with some R83.
Thanks for stopping by! Hope you are having a fab-o weekend! ~Tori

Friday, May 14, 2010

Creating Custom Embellishments Tutorial over @ Whiff of Joy

Hi folks! I have a tutorial posted today over at Whiff of Joy's Tutorial & Inspiration Blog showing 3 techniques for creating your own custom-colored embellishments! Be sure and stop by over there to check it out.
I used stamps from the new Aladin 1001 Nights Store set for this card. The papers are from MME's Bloom & Grow DP and are paired with some Teal Bazzill and some Pumpkin Pie and Very Vanilla. I sponged some Bermuda Bay around the Vanilla panel. I colored her with my Copics and added lots of clear Stickles to her clothes. The punches used were from Martha Stewart & EK Success. I created my flower & dew drop embellishments using the techinques in my tutorial.

Thanks for stopping by! Have a nice weekend. ~Tori

Thursday, May 13, 2010

Whooo Hooooo!! We did it!!

Happy Thursday, y'all!! I have a busy next couple of days finishing up my kids soccer seasons, so I will make this kinda quick.

It's Thursday and you know what that means...New Digi's from Pink Cat Studio!! She is also giving away and awesome freebie with a purchase today only(make sure you scroll down to check him out)- can't beat that with a stick! I made this card using the Owls Graduate from School stamp for my daughter, who will graduate from the 8th grade in about a month. I am still coming to grips with having a child in high school in the fall! My baby will be in Kindergarten in the fall too...don't get me started. (sniff, sniff!) I used some MME Home DP for this card along with some Bermuda Bay and Regal Rose card stock. The crocheted flower is one of my handmade ones and if you are interested, I have some for sale in my Etsy store. The sentiment was computer generated, cut out using a Nestie tag die and airbrushed with some BG13 Copic marker. The ribbon is from American Crafts and the button and twine are PTI. The loopy border punch is Martha Stewart. I distressed the edges of the card stock and DP with my Heidi Swapp and then stitched around the edges and sponged some Regal Rose ink around the edges of the image.
In this close-up, you can see I added some Stickles to their caps. The image was colored with the Copic Markers below.
Here are the other images being released today. Check out the cute freebie owl - isn't he a hoot? hee, hee, hee...
Don't forget to stop by my fellow PCS DT friends (links are on my side-bar) to check out their awesome creations.

Also, if you have not stopped by already, be sure to stop by the Pink Cat Studio Blog and enter the Pink Kitty contest!! Good luck! ~Tori